shes included everything you need to make some great nail art designs. All you need to add is you creativity!!!!!!!!
First Step
You cant grab the brush, dip it in paint and expect to be the
nail artist equivalent to Monet! Nail art takes time and practise, to settle
into your own style. Begin with practising simple shapes, like stripes, dots
etc. This will allow you to become adjusted to your brush, and youll become
comfortable with using it and angling it.
You do not need to pile paint onto the brush.
Simply wet the brush at the tip, lightly dip it into the paint, so that the tip
is coated with a thin layer of it. Of course, if you want to do a design where
it requires heavy hand painting, ie painting large dots, then pile away! Most
nail artists tend to use a less amount though.
Try resting your arm on a table if your hand is a
little shaky. Take your time, do not rush yourself.
Becoming More Acquainted With Nail Art
Once your comfortable, and confident that you can paint the
basics, try notching your creative side up. Flowers, hearts etc are easy to do,
and look eye-catching and pretty too!
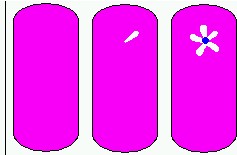
To do flowers
1. Paint on a base coat colour. Any colour you wish!
2. Carefully dip your brush into acrylic paint, any colour, but
if your base colour is light, try a dark colour, ie blue, and if its dark, try a
light paint colour, ie white! Take your brush and gently paint a little line,
imitating a petal. If you want it to be easier, load your brush a little heavy,
then place your tip down, flat on the nail, so the imprint of the brush shape is
left. Do this 5 times, for 5 petals.
3. Paint a dot in the centre on the petals, acting as the
middle of the flower.
4. Paint more over the nails in the same fashion, or just leave
it as one. Remember to seal with topcoat!!
 You can always expand on
this design! Instead of painting the middle, try using a rhinestone! Sparkly and
pretty! Just dab some topcoat or just clear varnish over the flower, wet the end
of a cocktail/orange stick. Place the tip of the stick onto a rhinestone so that
it is picked up. Carry it over to the flower and place it in the centre. You may
want to push it down with the end of the stick, so it sticks into place better!
DO NOT FORGET TO SEAL IT!!
You can always expand on
this design! Instead of painting the middle, try using a rhinestone! Sparkly and
pretty! Just dab some topcoat or just clear varnish over the flower, wet the end
of a cocktail/orange stick. Place the tip of the stick onto a rhinestone so that
it is picked up. Carry it over to the flower and place it in the centre. You may
want to push it down with the end of the stick, so it sticks into place better!
DO NOT FORGET TO SEAL IT!! 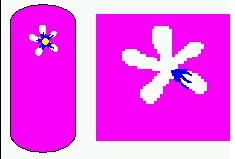
Another idea you could do is adding flashes of colour onto the
petals. After painting the petals in one colour, take your brush, wet the tip
and dip it carefully into a darker or lighter colour. Very slowly and gently,
starting from the centre of the flower, slide the brush tip down the side of the
petal, stopping about halfway. You should be creating a thin line of colour.
Repeat until thin lines have been created across the whole petal, it usually
takes about 3-4 lines for me.
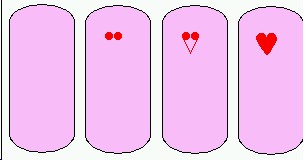
To do a heart
1. Apply a base colour.
2. Paint on 2 quite large dots, next to each other.
3. From the outside of each dot, draw a diagonal line, so youre
forming a V shape, with the 2 dots at the top.
4. Fill in the space inside the V. Then, with a light amount of
paint on your brush, fill in the outsides, forming a more curved and fuller
heart shape. Then add topcoat.
Practising with basic shapes like these will build up your
ability. Try placing the designs together, having hearts and flowers in one
design. Experiment with different colours too. Add rhinestones and glitter And
most of all, have fun while youre experimenting.
A Lil Bit Harder
After youve dabbled with the basic forms of nail art, its time
to get your fingers doing some more complex artwork. Your imagination is your
only limit, so you can do whatever you want on a nail!
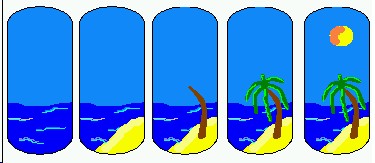
Here are instructions for creating a beach scene. Its a more
simple version, but after you have mastered this, you can adapt it to your own
scene!
1. Paint the bottom half of the nail a darkish blue colour to
represent the sea, then paint the rest a lighter blue, for the sky. Take a light
blue paint (remember, you can mix your paints! Dab some blue onto a palette and
mix in white paint!!), and using paint little stripes across, to show the
reflection on the water.
2. Paint an island! It might help to paint it in white acrylic
paint first, then paint on yellow once its dry. This acts as a base coat, so
none of the blue varnish underneath will show through.
3. Paint the palm tree trunk! Take a brown colour paint, and
paint a stripe, but, try to curve it, and make it a bit thick, as in the
picture.
4. The leaves. Using curved stripes again, in green paint. You
can add an more realistic touch, by adding a lighter green colour on them, using
the same technique as I explained with the flower petals.
5. Paint a white circle and fill it in. Once its dried, colour
it with yellow. Once that has dried, paint one half orange. Once the design has
dried, topcoat it!
Leopard Print
This is more easier, but is very eye-catching!
1. Paint on a gold-ish base colour.
2. Taking a slightly darker gold/brown/yellow colour, paint on
large spots, but make them jagged looking.
3. Taking a dark brown colour, paint on an outline for each
dot. I usually paint this outline in 3 pieces, so that there are chunks or
darkness around the spots. Add random dots of dark colour around the shapes.
Finish with topcoat.
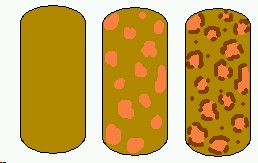
You can use many different colours for this design!! Pink and
white looks very funky and blue and pink is a nice variation too!! Let your
imagination run wild!
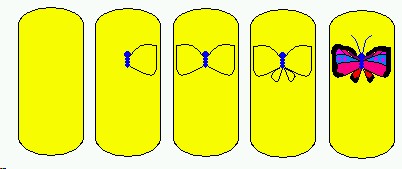
The Butterfly design is quite hard to masterbut plenty of
practise and youll get it in no time!!
1. Paint on a light base coat colour. In the centre, paint 3
dots, one big, for the head, and 2 smaller ones for the body.
2. Loading a very small amount of black/white paint on the
very tip of your brush, carefully and lightly paint a line, starting from
the head. Curve it into the shape of a wing and end it back to the body. Repeat
for the other side.
3. Do the same for the smaller wings, on both sides.
4. Decorate your butterfly! You can do this anyway you want to,
using any colours or patterns. Then finish by adding 2 thin swooping lines for
the antennae! Topcoat the design. You could always use rhinestones for the body,
instead of paint, or you could put rhinestones on the wings!!
Moving On
Ok, so youve seen how a few harder designs are done. Now lets
do some even harder ones!!
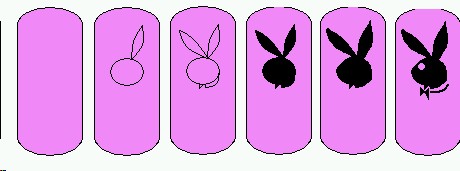
The Playboy Bunny.
This is quite hard to do, it took me several
attempts to get this right!
1. Paint on a base coat colour. Using a fine
amount of black paint, draw a circle with the very tip of your brush. Using
curved lines, draw the right ear.
2. For the next ear, draw a slightly curved line,
starting from the base of the other ear, and stretching out to the left. Using a
more curved line, start at the base again, curve the line and join it to the
other line you just painted.
At the bottom of the head, draw a line going down,
the another from the end of it, slanting back up. Next to that, draw another
going down, then at the back of the shape, where the circle curves, draw another
line going down. Join these 2 lines with a curved line. This is the neck and
bow-tie of the bunny!
3. Fill in the shape with paint. Adjust the shape
of the bunny, so make the front of the head less curved by taking a brush,
dipping it in the base colour, and painting over it. Fill in the ears a bit,
making them a little thicker, if needed. Basically, just adjust the proportion
until it looks ok to you.
4. Then, taking the base coat colour, paint on a
dot for the eye, or use a rhinestone! Take the colour of the bunny, and
carefully paint the bow-tie, which is basically 2 triangles, on their sides,
joined together. Paint a line under the neck for the collar. Topcoat
it!
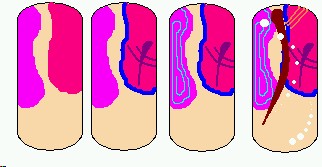
Abstract
The idea with abstract is that the design is made
from different shapes to form a pattern. You can do whatever you want when doing
abstract! But heres an idea to get you started
1. Start with a natural base, so either use a
clear basecoat, or paint the nail in a natural colour, like a manicure pink.
Paint 2 curved chunks of colour on each side, leave a space between
them.
2. Outline the right one in a darker colour, and
inside the chunk, paint 2 lines, then another cutting through them
both.
3. On the left chunk, take a light colour and
paint a spiral, copying the shape of the chunk.
4. Take a very dark colour, and paint a curved,
thick line, swooping from the top to the bottom. Paint on white dots from the
bottom of it, crossing over the line to the top. Make sure the spots start off
small then get bigger. Do another line of dots at the bottom.
5. In the top right corner, take a colour, then
just paint 3 lines. Topcoat the design. Add rhinestones if you wish, or add your
own shapes. :*)
Writing On The Nail
This takes a very steady hand and a lot of
patience!
1. Paint on a light base colour.
2. Dip ever so lightly into black acrylic paint
and write on the nail. Treat it is as if you were holding a pen and writing on
paper. You may want to practise using your brush and painting small scale onto a
scrap of paper. Use simple lines and curves to create a simple font type.
3. Repeat the text all over the nail, or just
leave it as one word etc. Topcoat it.
Techniques
Youre probably getting the hang of this nail art malarkey by
now!! So just to end, Ill go through 3 techniques
you may wish to introduce into your art.
Water Marbling Technique
You will need:
2-3 different colour polishes - glitters and frosted varnishes will not work. Just use normal.
Cup/jar/glass of cold/room temp water
A few cocktail sticks
Tissue
Newspaper
Cotton Buds / cocktail or orange stick with cotton wool wrapped at one end
Nail Varnish Remover
Base & Topcoat
1. Lay newspaper down on a table or flat surface, and set the glass of water on top.
2. Paint the nails to be marbled WHITE with white nail enamel, don't forget to apply base coat first.
3. Taking your first desired colour, drip a drop of enamel onto the surface of the water in the glass. Wait for it to spread out across the water, then add the 2nd colour onto the middle of the first colour. Wait for the colour to spread out, and drip the 3rd colour in.
4. Taking a cocktail stick, gently swirl the polishes to make patterns. Swirl slowly and gently.
5. Dip your nail/fingertip into the area of polish you desire, take the cocktail stick, swoosh the polish on the water to one side, and remove your finger.
6. Clean off polish from the cocktail stick with the tissue, and remove ALL traces of polish from the water.
7. Repeat steps 3-6 for each nail.
8. Take a cotton bud or cotton wool ended stick, dip in nail varnish remover and remove all traces of polish from the skin.
9. Apply topcoat.
Sponging Technique
You will need:
Sponge cut up into smaller pieces
Nail varnishes
Base & Topcoat
Palette
1. Apply basecoat to all nails.
2. Take a dark colour, i.e. a hot pink colour, and drip some drops onto the palette. Take the sponge, dab it into the paint, and sponge onto the tips of the nails.
3. Take a lighter colour, i.e., baby pink, and again, drip onto the palette. Using a new sponge piece or the other side to the one previously used, sponge on under the hot pink as well as slightly overlapping the 2 colours.
4. Take a white enamel, drip onto the palette. Lightly dab a new sponge into the white and gently sponge right at the bottom of the nail (the cuticle base). Slightly overly the baby pink, and slightly overlap where the hot and baby pink meet.
5. Apply topcoat for the colours to blend more and to make the varnish longer lasting.
Adding rhinestones, bullion, etc
You will need:
Rhinestones, bullion etc
Base & Topcoat
Cocktail stick
DO ONE NAIL AT A TIME
1. Apply base coat, wet the end of a cocktail stick.
2. Place the wet end of the stick onto a rhinestone or whatever you want to place on the nail. Carry it over to where you want it on the nail and place down. Press the end of the stick onto hard.
3. Repeat if you want more rhinestones etc.
4. Apply 2 coats of Topcoat.
Thats basically it!!! I shall be working on another help sheet soon, with more techniques and art to try. Meanwhile, try getting hold of some nail art books, try http://thecreativenailplace.co.uk which sell a large range of nail books. I highly recommend Nail Artistry, by The Untouchables, its full of colour photos, ideas and step-by-steps for beginners and professional nail artists.

